
Unit Testing
Prerequisites
Running Tests
If you have created a enact project using the enact cli it will have everything you need
to run tests. For a single-run, execute enact test.
You can also have the tests automatically run each time the filesystem changes simply with
enact test. If you built your app using enact cli you can also use
npm run test and npm run test-watch for short. Both commands will execute
the test suite and output the results to the console. If you are working on
framework modules, at a minimum you should perform the single test run on your
module before creating a pull request on a branch.
File Structure
Tests should be placed into a tests directory within the component directory. Test files begin with the name of the
component or item under test and end with the "-specs.js" suffix.
+ src
	+ components
		+ IconButton
			+tests
				IconButton-specs.js			<-- Tests go here!
			IconButton.js
			package.json
Tools
We use a dizzying number of tools to perform unit testing. A quick overview of the different tools can be helpful.
- Jest - A test framework. This tool allows us to setup, assert and run tests. We can also use
jestas a mocking library. - React Testing Library - A test library for use with React. It allows us to render components and inspect the output.
- jsdom - A pure-JavaScript implementation of many web standards, notably the WHATWG DOM and HTML Standards, for use with Node.js.
Unit Testing
Unit testing is the core of our testing platform. Unit testing only tests the smallest units of code. Typically a test just tests a function/method. For Enact framework developers testing will also extend into component and virtual DOM testing.
We are using Jest as our testing framework. We won’t cover all the functions this gives us in this document. We suggest looking at the Jest Docs after finishing this if you want to know all of the things Jest can give you.
Say you have a function like this:
const add = (numA, numB) => {
	return numA + numB;
}
To test this function in Jest we could write something like:
test('Should add the two arguments together', () => {
	const expected = 3;
	const actual = add(1,2)

	expect(actual).toBe(expected);
});NOTE: This test is a very simplistic example. This is probably code that should not need to be tested in production, but
it’s a good way to illustrate basic unit testing.
This is a decent unit test, but what happens if somebody implemented the add() function like this:
const add = (numA, numB) => {
	return 3;
}

// or

const add = (numA, numB) => {
	return numA + 2;
}
The test would pass every single time, but the function would still fail in most cases. This is an extreme example of poor code, but it does show where unit tests can break down because of certain assumptions.
Something better would probably be:
test('Should add the two arguments together', () => {
	let expected = 3;
	let actual = add(1,2);

	expect(actual).toBe(expected);

	let expected = 30;
	let actual = add(10,20);

	expect(actual).toBe(expected);

	let expected = 123;
	let actual = add(111, 12);

	expect(actual).toBe(expected);
});NOTE: Unlike this example, developers should strive for having a single
expect()per test.
This way we can think of edge cases that may surface bugs in our code. For a simple function like add() this may be
overkill, but for some complex code/algorithms it makes sense to test this way. Using this simple way of checking inputs
and outputs we can test basically any JavaScript function that returns a value.
Testing React
To test react we use React Testing Library plus other tools you can find out about here.
const Text = (props) => {
	return <p>{props.content}</p>;
}

test('Should contain text', () => {
	render(
		<Text content='sample' />
	);

	const textElement = screen.queryByText('sample');

	expect(textElement).toBeInTheDocument();
});
React Testing Library provides the following methods regarding render.
render()
render is the DOM representation. It will print a string of the output dom that the browser sees.
rerender()
rerender is used to update the props of a rendered component in your test.
unmount()
unmount is used to cause the rendered component to be unmounted.
Why Unit Testing?
The reason to write unit tests is because they are the most simple things to test. The Enact framework code (or an Enact application based on best practices) is essentially made up of units. Sometimes code can be more complex and a simple unit test will not suffice, but a majority of the things that break can be tested by unit tests.
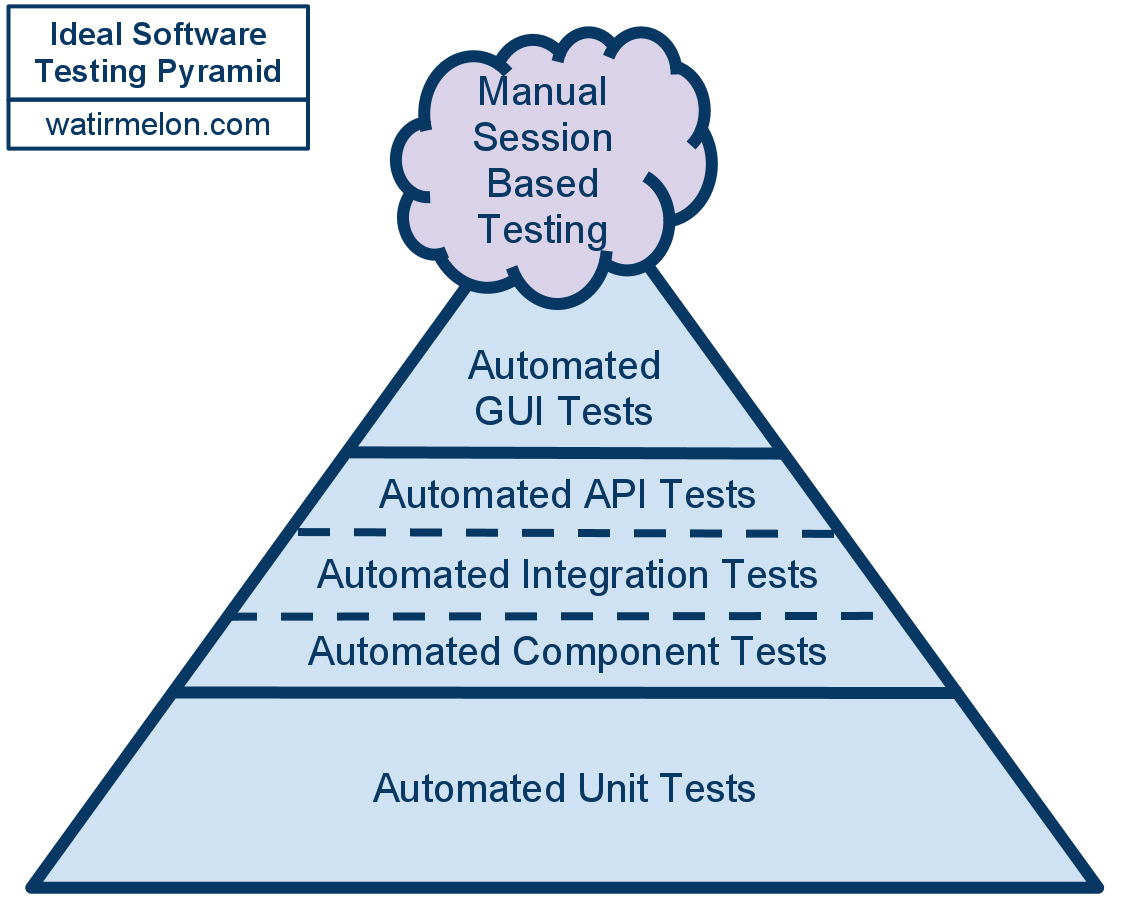
In the following image, automated unit tests are at the bottom meaning they are the foundation. They are the ones that should be the majority of the test suite. We can assume that if we write enough good unit tests that pass then when we combine our functions they will work in many different scenarios.
Goal of Unit Testing
The goal in unit testing, as well as testing in general, is to give us confidence in our code. We want to know that our code works, and in the future won’t break. We strive to add value with the tests we add. Not just add tests to cover every single possible outcome. Before you add a test, determine if it is necessary condition/scenario to test and will it benefit the project in the long run?
What Unit Testing Should Not Do
Although testing is very helpful, it is not necessary to pursue 100% code coverage. We believe it is not realistic. In the framework, we try to cover as much as we think will help, but we do not want to spend time on tests that add no value.
For instance, you don’t need to test other things that are already robust (likely having their own tests already), such as standard library functions or basic JavaScript behavior.
// this is probably going to work
const returnArg = (arg) => {
	return arg;
};

test('Should return arg', () => {
	const actual = returnArg('sample');
	expect(actual).toBe('sample');
});
This example looks quite silly, but let’s look at it in a React context:
//original code
const Text = ({content, ...rest}) => {
	return (<p {...rest}>{content}</p>);
};

//breaking change
const Text = ({cont, ...rest}) => {
	return (<p {...rest}>{cont}</p>);
};

//Example A - Bad
test('Should pass prop to component', () => {
	render(
		<Text data-testid='text' content='sample' />
	);

	const textElement = screen.getByTestId('text');
	const expected = 'sample';

	expect(textElement).toHaveAttribute('content', expected);
});

//Example B - Better

test('Should contain text', () => {
	render(
		<Text content='sample' />
	);

	const textElement = screen.queryByText('sample');

	expect(textElement).toBeInTheDocument();
});
In this example a change was made to the Text component. We’ve changed the property name from content to cont.
In test Example A, we can be very confident that React will do this correctly (pass the property content with the value
"sample"). We know that React will pass properties to child components. There is a high chance that this test won’t
break, even if somebody makes a change to the code. Example A will continue to pass because it tests passing arguments,
not what the component is supposed to display.
In test Example B, we have something that is fairly simple, but has a higher chance of breaking. By testing the final output and not the property we get an accurate test. Also, this is likely the only test we’d need for such a simple component.
How Tests Influence Code
TDD can influence our code before we even write it. It can help us focus on making our functions simple and robust, but in order to do that we should learn a bit about the code that is easiest to test.
Pure Functions
The easiest functions to test are “Pure Functions” From wikipedia pure functions are described as:
- The function always evaluates the same result value given the same argument value(s). The function result value cannot
depend on any hidden information or state that may change while program execution proceeds or between different executions of the program, nor can it depend on any external input from I/O devices (usually—see below). 2. Evaluation of the result does not cause any semantically observable side effect or output, such as mutation of mutable objects or output to I/O devices (usually—see below)
Simply stated, this means we can’t have anything other than the arguments determine the code’s arguments result.
//Pure Function
const add2 = (num) => {
	return num + 2
}
add2(4) //6

//Class Version
class Num {
	constructor(num){
		//this is state
		this.num = num;
	}
	//Non-Pure
	add2(){
		return this.num + 2
	}
}

const newNum = new Num(4)
newNum.add2() //6
In the example above if you call the pure function add2(4) you will always get 6.
In the class version, however, the number passed to the constructor is kept as an instance variable. If that instance
variable changes the result of add2() will change as well. Since it relies on mutable state, the function is not pure.
This is called a side effect.
We try to use pure functions as much as possible and it can make our code easy to test and reason about.
Side Effects
Side Effects include:
- Mutable State
- Mutable Value
- HTTP requests
- Database Calls
- Basically anything out side the scope of a function
Side effects are difficult to test, so we prefer to limit them to only when needed. Favor pure functions and stateless functional components if possible. That means do not abuse React component state if you do not need it.
Unfortunately, we can’t always write pure functions. Sometimes we may have to use React’s component state, we may have to make an AJAX call, etc. These are good reasons to not use pure functions. These functions are tougher to test but, not impossible. For example, if you are using Redux for complex application/component state management, you may be using side effects to get some of your data. The Async Action Creators section in https://redux.js.org/recipes/writing-tests shows how you can write tests in those cases.
What to do next
Please refer to our document Test Driven Development(TDD), it contains how to run tests and how they fit in our testing strategy. It also contains more information about TDD and the methodology behind it. This document is a deeper dive into the unit test specifically.